RV Furnace Not Working? When to Maintain, Repair, or Replace It
When an RV furnace stops producing heat, it is easy to assume the furnace needs an expensive part—or that the entire unit needs to be replaced. That is often premature. An RV propane furnace depends on several supporting systems. A weak battery, restricted airflow, a poor electrical connection, a thermostat problem, or an interrupted propane supply can prevent a perfectly repairable furnace from operating.
The key is to diagnose the problem in the order the furnace operates. This guide explains how an RV furnace starts, what common symptoms mean, which maintenance items an RV owner can inspect, when a targeted repair makes sense, and when replacement may be the safer and more economical choice.
Important safety note: RV furnaces combine propane, electricity, high temperatures, and combustion gases. Basic visual inspections and electrical checks may be appropriate for a capable DIY owner, but propane-pressure testing, gas-valve work, burner adjustments, combustion-system repairs, and furnace installation require the correct training and equipment. If you smell propane, hear delayed ignition, see soot, suspect a damaged heat exchanger, or have a carbon-monoxide alarm, turn the appliance off and have the RV inspected by a qualified technician.
The Four Things an RV Furnace Needs
Most RV propane furnaces need four basic conditions before they can produce heat:
A call for heat from the thermostat
Strong, dependable 12-volt DC power
An adequate supply of propane
Proper airflow through the furnace and duct system
Propane creates the heat, but the furnace is still a 12-volt appliance. The blower motor, circuit board, gas valve, safety switches, and ignition system all depend on the RV’s DC electrical system. That is why an RV furnace problem is not automatically a propane problem. A battery may run the lights but still drop below the voltage the furnace needs when the blower starts. A loose ground, corroded connection, failing converter, damaged thermostat wire, or excessive voltage drop can also interrupt operation.
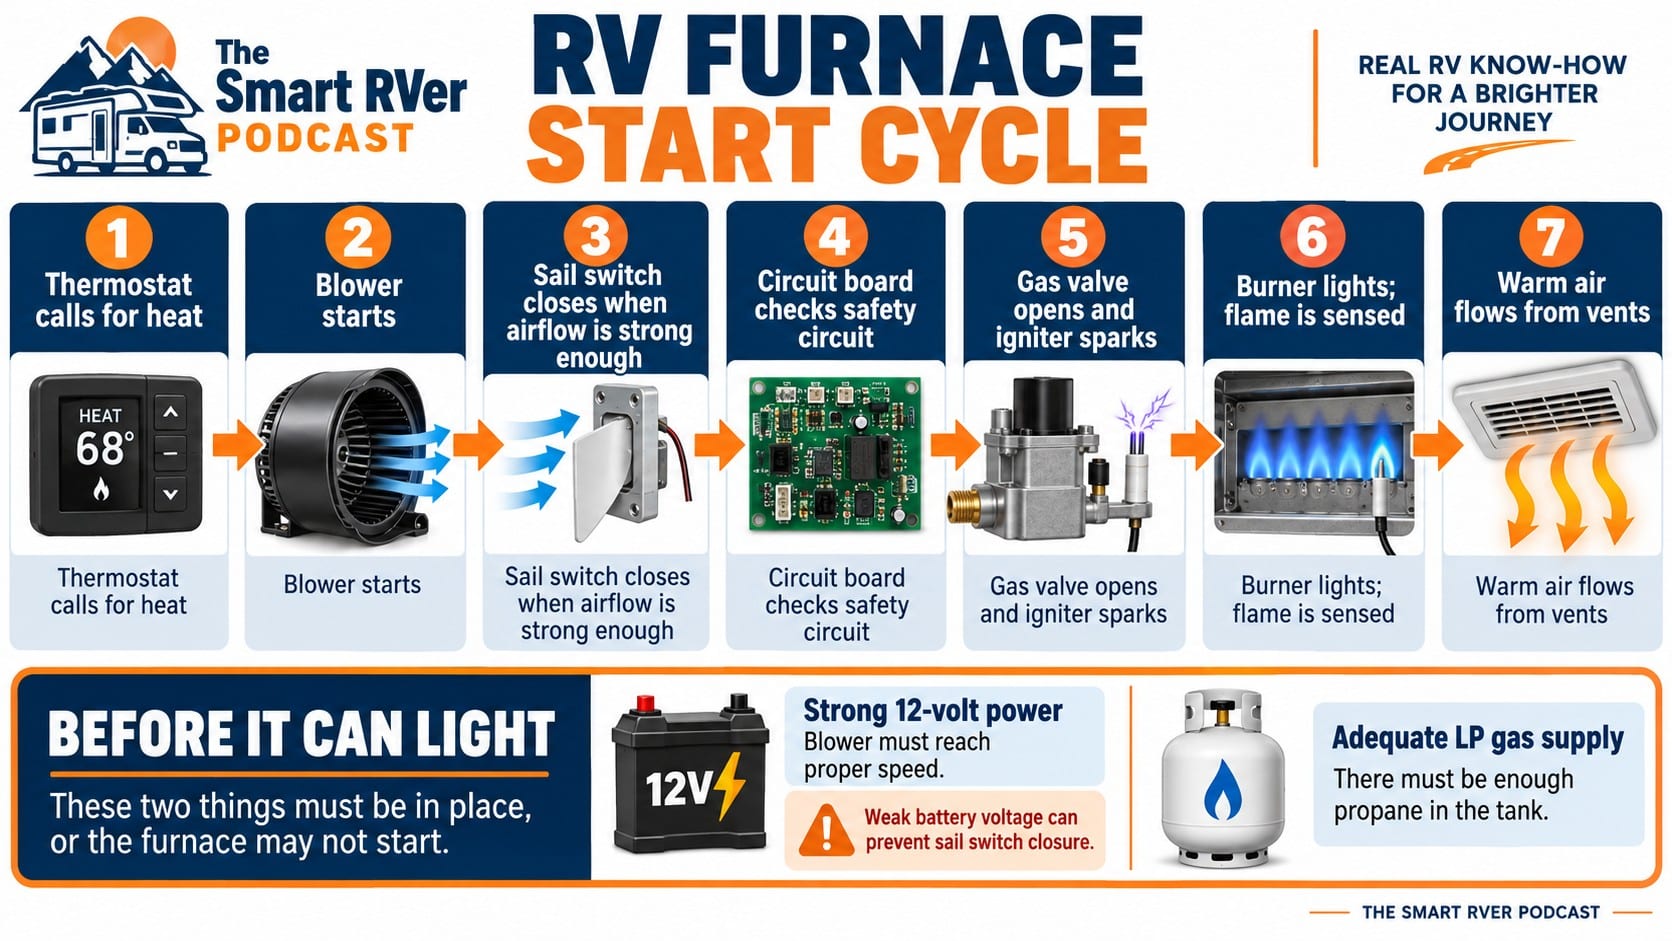
How an RV Furnace Starts
Knowing the normal startup sequence gives you a logical troubleshooting path.
1. The thermostat calls for heat
The thermostat closes the heating circuit and tells the furnace to begin operating. In many RV systems, the thermostat acts as an on-and-off switch rather than supplying power to the furnace.
2. The blower motor starts
The circuit board starts the blower before allowing propane into the burner. This purge period helps establish airflow and clears the combustion area.
3. Airflow closes the sail switch
The blower must reach sufficient speed to move the sail switch. This safety device tells the circuit board that airflow is present. If the sail switch does not close, the furnace should not open the gas valve or attempt ignition.
4. The furnace opens the gas valve and sparks
After the required safety conditions are satisfied, the circuit board opens the gas valve and activates the electrode. You may hear the gas valve click and the igniter begin sparking.
5. The burner lights and the flame is verified
Once the burner lights, the furnace must confirm that a stable flame is present. On many RV furnaces, the same electrode used for ignition also senses the flame. If the board does not detect the flame, it closes the gas valve. Depending on its design, the furnace may retry before entering ignition lockout.
6. Warm air moves through the RV
The blower distributes heated air through the furnace ducts. When the thermostat is satisfied, the burner shuts off, and the blower normally continues for a short cooldown period. The point at which this sequence stops is often the most useful diagnostic clue.
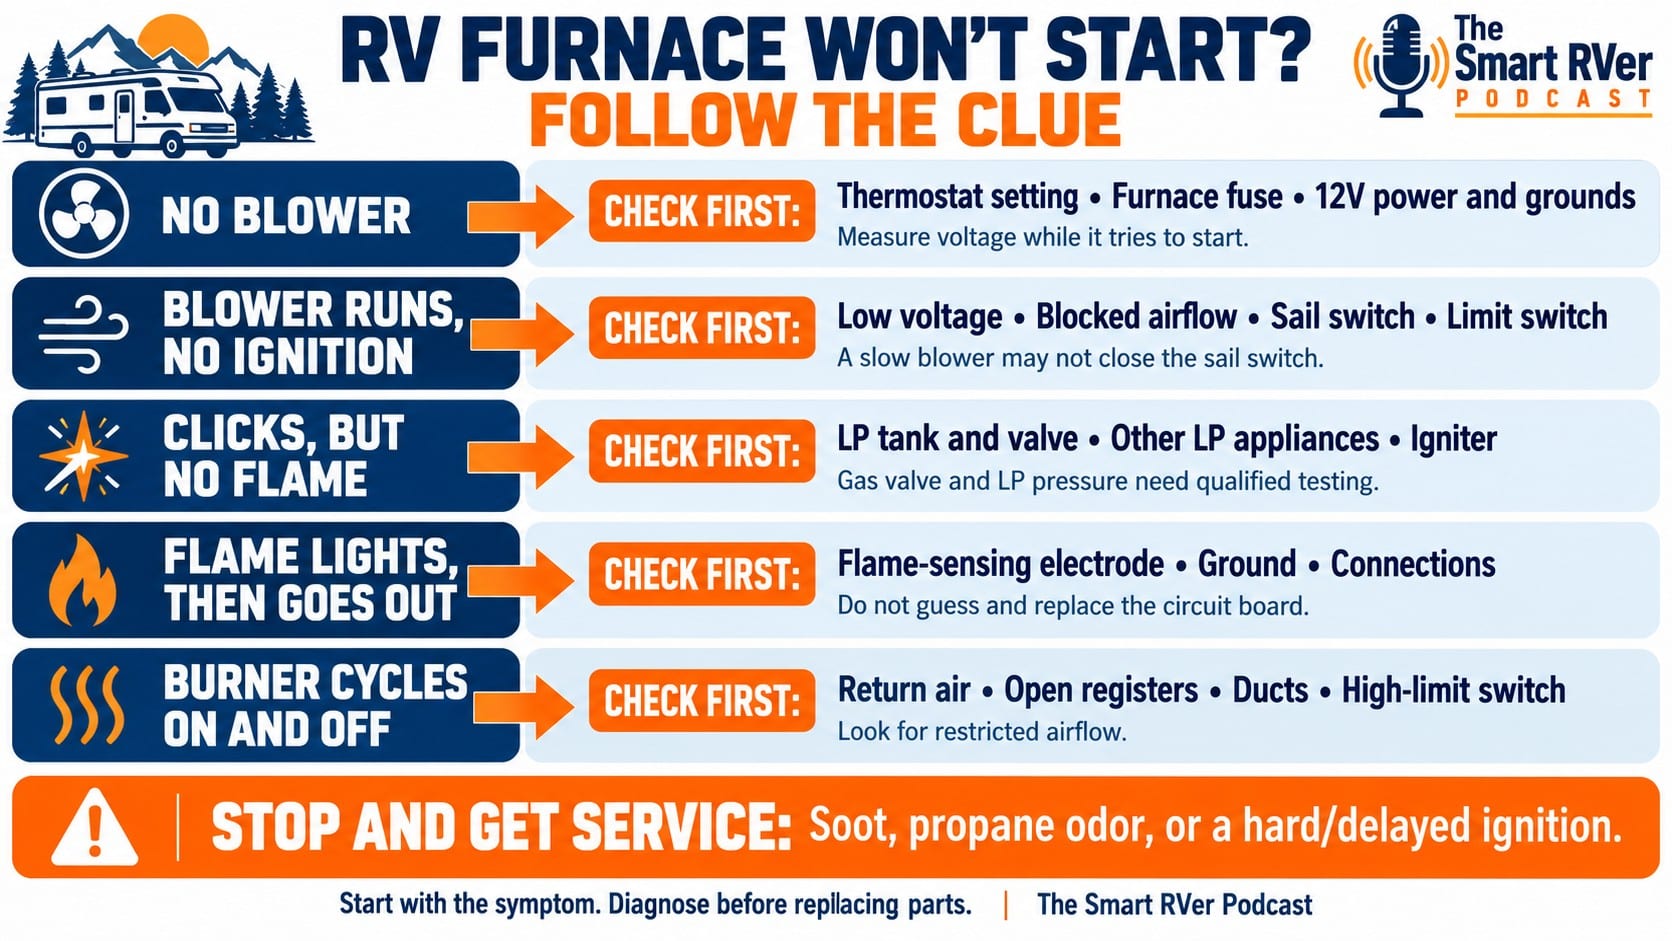
Before ordering parts, listen to the furnace. What it does—or does not do—can narrow the problem considerably.
Nothing happens when the thermostat calls for heat
If the furnace is completely silent, begin with the thermostat and 12-volt electrical system.
Check the following:
Is the thermostat set to heat and above the current room temperature?
Is the furnace fuse good?
Is the battery charged?
Is 12-volt power reaching the furnace?
Are the battery and furnace grounds clean and secure?
Is the furnace’s service switch on, if equipped?
Are the thermostat wiring and connections intact?
A multimeter is extremely valuable here. Test voltage while the furnace is attempting to start, not only when the system is sitting idle. Voltage that looks acceptable without a load may drop sharply when the blower motor tries to run.
The blower runs, but the furnace does not try to ignite
If the blower operates but you do not hear the gas valve or igniter, the furnace may not be completing an airflow or safety check.
Possible causes include:
Low battery voltage
Excessive voltage drop
A blower motor running too slowly
A dirty, obstructed, or failed sail switch
Restricted return air
Blocked or inadequate ductwork
An open high-temperature limit switch
Damaged wiring or a poor connection
A circuit-board problem
People often blame the sail switch, but the switch itself isn’t always defective. It may simply be reporting that the furnace does not have sufficient airflow. Replacing the sail switch will not fix a weak blower motor, low voltage, a blocked return-air opening, or a crushed duct.
The furnace clicks or sparks but does not light
If the furnace reaches the ignition stage but the burner does not light, confirm that propane is available before condemning furnace components. Make sure the cylinders contain propane and the valves are open. If another propane appliance operates normally, that helps confirm that propane is reaching at least part of the RV system.
Possible furnace-related causes include:
Air in the propane line
Improper propane pressure
A contaminated burner
An obstructed burner orifice
Incorrect electrode position
A damaged electrode or ignition wire
A faulty gas valve
A poor electrical connection or ground
A failing circuit board
Do not use an open flame to test for a propane leak. Perform propane-pressure testing and work involving the gas valve or burner with the proper tools and training.
The burner lights and then shuts off
If the burner lights briefly but will not stay lit, the furnace may not be producing a flame.
Possible causes include:
A dirty or incorrectly positioned electrode
A cracked electrode insulator
A damaged ignition wire
A poor furnace ground
Reversed polarity or wiring problems on applicable systems
Burner contamination
Improper propane pressure
A circuit-board problem
Flame-sensing systems can be sensitive to grounding and electrical connections. A new circuit board won’t fix a poor ground.
The furnace starts and stops repeatedly
Short cycling does not always mean the thermostat or circuit board has failed.
Look for:
A blocked return-air opening
Closed or obstructed heat registers
Crushed, kinked, torn, or disconnected ducts
Inadequate duct capacity
High-temperature limit cycling
A thermostat mounted near a heat register
Loose thermostat wiring
Poor heat distribution
A furnace that is incorrectly sized for the RV
When airflow is restricted, the burner may shut down on the high-temperature limit while the blower keeps running. After the furnace cools, the burner may relight. That pattern can look like an intermittent electrical problem when the real cause is airflow.
The furnace makes a new or unusual noise
RV furnaces are not silent, but new noises deserve attention.
Scraping, squealing, grinding, banging, or heavy vibration could point to:
Debris in a blower wheel
A blower wheel rubbing its housing
A damaged blower wheel
Worn motor bearings
Loose mounting hardware
Vibrating or damaged ductwork
A burner or delayed-ignition problem
Treat a delayed or unusually forceful ignition sound seriously. Turn the furnace off and have the combustion system inspected.
Preventive maintenance will not eliminate every component failure, but it can correct or reveal many problems before a cold night exposes them. Always turn the furnace off, allow it to cool, and follow the manufacturer’s instructions before inspecting it.
Keep the return-air area clear
The furnace needs interior air returning to it. Shoes, blankets, storage containers, pet beds, and other camping gear can restrict that airflow. Make sure the return-air grille is open and reasonably clean. Do not add a filter unless the furnace or RV manufacturer specifically calls for one. An unapproved filter can restrict airflow.
Inspect the heat registers and ductwork
Open the registers and look for obvious restrictions. Inspect accessible flexible ducts for sharp bends, crushed areas, tears, or disconnections. A detached duct may dump heated air into a cabinet, enclosed space, or storage compartment instead of the living area.
Inspect the exterior intake and exhaust
Look for:
Insect nests
Spider webs
Mud-dauber nests
Leaves or other debris
Soot
Corrosion
Water intrusion
Damage to the vent or furnace door
Do not push tools deep into the intake or exhaust, alter the vent, or install unapproved screens. The combustion-air and exhaust system must remain in its approved configuration.
Soot around the exhaust is not ordinary dirt. It can indicate incomplete combustion, burner contamination, airflow problems, improper propane pressure, or another condition that requires correction.
Listen to the blower
Pay attention to how quickly the blower reaches speed and whether it squeals, scrapes, rattles, or vibrates. A slow blower may fail to close the sail switch. It can also reduce the furnace’s ability to move heat safely.
Check the safety alarms
Every RV using propane appliances should have working propane, smoke, and carbon-monoxide alarms. Test the alarms and check their replacement or expiration dates. A detector may respond to its test button and still be beyond its recommended service life. Never operate the furnace without functioning safety alarms in the RV.
When Repairing the RV Furnace Makes Sense
A furnace doesn’t need to be replaced just because it is old or has one failed component.
Repair may be the best choice when:
The furnace cabinet and heat exchanger are sound.
Corrosion and water damage are limited.
The failed component has been properly diagnosed.
Replacement parts are readily available.
The repair cost is reasonable compared with replacement.
The furnace has otherwise been dependable.
The furnace is correctly sized and installed.
A thermostat, sail switch, limit switch, blower motor, electrode, gas valve, or circuit board may be replaceable without replacing an otherwise serviceable furnace. Consider age, but condition and parts availability matter more than the calendar alone.
When Replacing the RV Furnace Is the Better Decision
At some point, continuing to repair an old furnace becomes impractical—or unsafe.
The heat exchanger or combustion chamber is damaged
The heat exchanger separates combustion gases from the air delivered into the RV. If it is cracked, burned through, or severely corroded, the furnace should not remain in service. Do not attempt to patch a damaged heat exchanger.
The furnace has severe rust or water damage
Minor surface rust does not automatically condemn a furnace. Extensive corrosion around the burner, combustion chamber, heat exchanger, gas components, wiring, or control system is different. When damage is widespread, replacing individual parts can become an expensive attempt to preserve an unreliable appliance.
Important parts are obsolete
Before investing heavily in an older furnace, consider whether its other major components are still supported. One replacement part may be available today, but the next failed component may not be.
Repairs have become repetitive
One repair does not justify replacement. However, if the furnace has recently received a motor, circuit board, gas valve, electrode, and other components yet remains unreliable, it may be time to stop repairing it one piece at a time. Add up the repairs. A series of smaller bills can approach the price of a replacement without providing the reliability of a complete new furnace.
Reliability has become unacceptable
How you use the RV matters. Someone who occasionally takes the chill off on a cool morning may view the decision differently from an RVer who regularly camps in freezing weather and depends on the furnace to protect plumbing and occupants.
What to Check Before Buying a Replacement RV Furnace
An RV furnace replacement is not always a direct swap, even when the new unit has a similar BTU rating.
Verify:
Furnace cabinet dimensions
BTU input and heating requirements
Required return-air opening
Number, size, and arrangement of heat ducts
Propane-line location
12-volt wiring and amp requirements
Thermostat compatibility
Exterior intake and exhaust configuration
Access-door or vent-kit requirements
Required clearances
Mounting arrangement
Manufacturer installation instructions
A larger furnace is not automatically better. The replacement must match the RV’s space, ducting capacity, electrical system, propane system, and approved vent arrangement. Some aftermarket furnaces may require a different exterior door or vent kit. In certain installations, that can mean permanently modifying the RV’s sidewall. For example, a Fogatti furnace may be worth evaluating for a particular RV, but confirm the furnace dimensions, door kit, vent arrangement, and required coach modifications before cutting or drilling anything.
Never improvise combustion-air or exhaust components simply to make a furnace fit.
A Simple Maintain, Repair, or Replace Decision
Maintain it when:
The furnace operates but needs cleaning or airflow correction.
Return air or registers are obstructed.
Accessible ductwork is damaged or disconnected.
Electrical connections need attention.
The exterior vent needs inspection or cleaning.
The furnace is otherwise safe and dependable.
Repair it when:
You’ve identified the exact failed component.
The heat exchanger and furnace structure are sound.
Parts remain available.
The cost is reasonable.
The rest of the furnace has a good service history.
Replace it when:
The heat exchanger or combustion chamber is compromised.
Corrosion or water damage is severe.
Critical parts are obsolete.
Repairs have become repetitive.
The furnace is incorrectly sized or improperly installed.
You can no longer rely on it when heat is essential.
The biggest mistake is jumping to the most expensive answer before checking the systems that support the furnace.
Start with the thermostat, battery voltage, fuses, grounds, propane supply, return air, ductwork, and normal startup sequence. At the same time, never allow the desire to save an older furnace to outweigh a genuine propane, combustion, or carbon-monoxide concern.
An RV furnace should do more than produce heat. It should produce heat safely and reliably.
Maintain it while it is healthy. Repair it when the repair makes sense. Replace it when its condition, safety, or reliability tells you it is time.
Why does my RV furnace blower run but produce no heat?
The furnace may not be moving enough air to close the sail switch, or the ignition sequence may be interrupted. Check battery voltage under load, return-air restrictions, heat registers, accessible ductwork, and the propane supply before replacing parts.
Can a weak RV battery prevent the furnace from lighting?
Yes. The blower may run without reaching the speed needed to close the sail switch. Low voltage can also affect the circuit board, gas valve, and ignition system. Measure voltage while the furnace is trying to start.
How do I know whether the RV furnace sail switch is bad?
A blower that runs without an ignition attempt can indicate that the sail-switch circuit is not closing, but the switch is not always the cause. Low voltage, a slow motor, debris, restricted return air, or damaged ductwork can all prevent adequate airflow.
Why does my RV furnace light and then shut off?
The furnace may not be sensing the flame. Possible causes include a dirty or misaligned electrode, a damaged ignition wire, a poor ground, burner contamination, improper propane pressure, or a circuit-board problem.
Why does my RV furnace keep turning on and off?
Short cycling may be caused by restricted airflow, blocked registers, damaged ductwork, high-limit cycling, thermostat location, loose wiring, poor heat distribution, or incorrect furnace sizing.
How long should an RV furnace last?
There is no single service-life number that applies to every furnace. Usage, moisture exposure, maintenance, installation quality, parts availability, and operating conditions all affect longevity. Evaluate the furnace by its condition, repair history, and reliability rather than age alone.
Can I replace an RV furnace myself?
Replacement involves propane, 12-volt wiring, combustion air, exhaust venting, required clearances, and operational safety testing. A capable owner may understand the installation, but many should have a qualified RV technician perform or verify the work.